Summary of Features
Detailed Features
What's New?
Release Notes
Download
Installation & Getting Started
License & acknowledgements
Project Info
User's Guide
Library Window
Playlist Window
Track Editor Window
Customization
Advanced Topics
Regular Expressions
Trouble Shooting
Tables
ID3 Frame Descriptions
Command Line
jampal Command
Making an Envelope
Tag Backup
Text to Speech
Author
Peter Bennett
My Other Projects
Peter's Backup
Proxy and debug tool
General
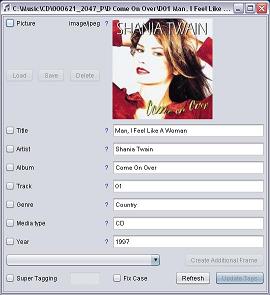
This window is opened from the library or playlist. When it first opens it displays the details of any selected track, or the first of multiple tracks selected.
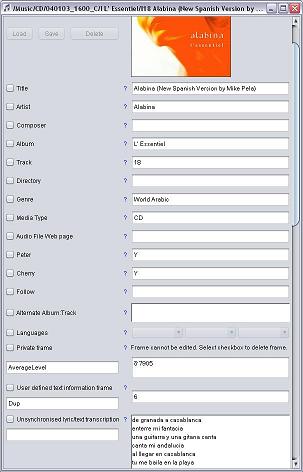
The window may open shorter or taller, depending on the number and size of frames in the tag. If there is a lot of information it will have a verical scroll bar. You can have an unlimited number of frames in a tag so the window could be very tall. See the two examples above.
While it is open you can still access the library. By clicking in the library window you can show the details of other tracks. The editor window dynamically updates to show the details of a new track selected, unless any check boxes next to fields have been checked.
Checkboxes
Each field has a checkbox at the left. Before you can modify a value you must select the checkbox. Once you have selected any checkbox on the page, the view is locked, changing the selection in the library no longer updates the display, so that you do not accidentally erase values you have keyed.
Blue Question Marks
Next to each value is a blue question mark. Clicking this will open a window showing an explanation of the frame from the ID3V2 standards document. To find explanations of frames not existing on the track, use the "Create Additional Frame" to add a frame, then click the blue question mark.
Description
Under the checkboxes are sometimes space for another field to be entered. This is the "Description" field that is used by some frames in the ID3v2 standard. Depending on the tag id, by using different descriptions and languages you can have multiple versions of the same tag, for example the "Comments" tag.
Language
Under the description there is in some cases a language. This is supported by certain ID3v2 frames to allow comments, lyrics and other items to be entered in more than one language.
Pictures
The "Attached Picture" frame allows pictures to be added to a track. By entering different descriptions and different picture types you can attach as many pictures as you want to. Most pictures on mp3 files have a blank description and type of "other". There are load, save, and delete buttons attached to each picture. You can load a picture from a file, save it to a file or delete it from the track.
The default picture with no description is set up as the first frame on the editor page. If there is no picture, a white space with the message "Drop Picture Here" will display.
You can drop a new picture on to an existing picture to replace it or onto the white space marked "Drop Picture Here". You can drag it from an explorer window or from a browser (Internet Explorer) window.
Song Language
If you select the language tag to be visible on the track editor or you add it with "Create Additional Frame", you can select up to three languages for a song. This affects the announcements. The announcements use the last language selected, so if there are several languages in a song, set the last one in the list as the language most appropriate to the song title.
Alternate Album
You can add a prompt to your tag editor for Alternate Albums and
tracks. You can enter here additional albums on which the song
appears, followed by a colon and the track number on that album.
After updating the tag extra entries will appear in the library
showing the song under different albums. The extra entries will be
identified in the library by a flag ( ) next to the album name. You can
remove duplicate songs from your hard drive to save space and still
have them visible in the library under each album.
Create Additional Frame
From the drop down list near the bottom of the window you can select a field name. Then by clicking the "Create Additional Frame" button that field will be added to the bottom of the window. You can then fill in its values for updating onto tracks. You can create an unlimited number of additional frames, either text or pictures. After creating a frame, if you decide not to use it, simply undo its check box.
Super Tagging
If you select this check box, you can type a delimiter into the text entry field next door. This delimiter is then used to split the file name into parts which can then be updated into the track tag. For example if your track's file name is "1 - Like a Prayer - Madonna.mp3", you can specify the delimiter as " - ". Then the first field is track number, second title, third artist. Type #1 into the track number field on the screen, #2 into the title and #3 into the artist. This is especially useful if you have a large number of tracks named according to the same method. They can all be updated in one go.
Other values you can use if you select Super Tagging are #RAN to insert a random number between 1 and 99, or #DIR to use the directory name (last part only).
If son titles, artists or any other value was typed into one or more songs in the wrong case (e.g. UPPER CASE or entirely lower case), you can repair one or more tags without retyping. Select Super Tagging and Type the value #TTL to convert the values to Title Case (Capital at the start of each word, lower case for the rest of the word).
During super tagging some substitutions are made. This is to help with certain characters that are not permitted in file names.
| Character in file name | Character used in tag |
| $ (Dollar Sign) | ? (Question Mark) |
| % (Percent Sign) | / (Slash) |
| @ (At Sign) | : (Colon) |
| _ (underscore) | (blank) |
Fix Case
This is a feature to repair values which have been keyed in UPPER CASE or entirely in lower case. If you select this check box, then all fields selected will be converted to "Title Case" (Each word starts with an uppercase letter). Any number of songs can be selected for this. Any values you have typed into the fields are ignored and pictures that have been placed on the page are not updated. This is equivalent to typing #TTL into the fields when using super tagging. However with super tagging you can update other fields with values at the same time, but with the "Fix Case" checkbox the only thing that is done when hitting the "Update" button is fixing the case of selected fields.
Refresh
This button discards everything you have done and displays the values from the first track currently selected.
Update Tags
This button goes through all tracks that are currently selected and applies updates to them all. Only values with the checkbox selected are updated. So for example you can select the album name field and select all tracks of that album. The name will be updated on all tracks. This is also useful for adding a picture to all tracks of an album. This is a powerful feature with many uses.
Deleting values
To delete a value from one or more tracks, just clear the text
value and update the tracks.
Updating Language or description
If you update the language or description of a frame, you will find
that you have two copies of it on your track, one with the old
description and one with the new. You should then delete the one
you do not want.
Duplicate Frames
If you add a frame, plus same language and description where
applicable, that already exists, then whichever one has a check box
will be written to tracks. If more than one of the same frame (plus
language and description where applicable) are checked, the last
one on the page will be used.

